Learn how to program games with the LÖVE framework
Be sure to read the comments in the code, I put a lot of important information in there
In a lot of 2D games the levels are made out of tiles. We're going to make our own tiled level.
Let's start off by creating a line. Create a table and fill it with ones and zeroes.
function love.load()
    tilemap = {1, 0, 0, 1, 1, 0, 1, 1, 1, 0}
end
This is our level. A 1 is a tile and a 0 is empty. Now we need to draw it. We loop through the table, and every time we encounter a 1, we draw a rectangle on its position.
function love.draw()
    --ipairs recap
    --ipairs is a special function that allows you to loop through a table
    --Every iteration i becomes what iteration the loop is at, so 1, 2, 3, 4, etc)
    --Every iteration v becomes the value on position i, so in our case 1, 0, 0, 1, 1, 0, etc.
    for i,v in ipairs(tilemap) do
        if v == 1 then
            love.graphics.rectangle("line", i * 25, 100, 25, 25)
        end
    end
end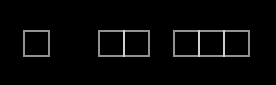
Okay so this works, but now we want to go vertical. We do this by putting tables inside a table, also known as a 2D table.
function love.load()
    tilemap = {
        {1, 1, 1, 1, 1, 1, 1, 1, 1, 1},
        {1, 0, 0, 0, 0, 0, 0, 0, 0, 1},
        {1, 0, 0, 1, 1, 1, 1, 0, 0, 1},
        {1, 0, 0, 0, 0, 0, 0, 0, 0, 1},
        {1, 1, 1, 1, 1, 1, 1, 1, 1, 1}
    }
end
So now we have a table filled with tables. See it as an Excel table.

1, 2, 3, etc. are what we call rows and A, B, C, etc. are called columns.
Another way to look at it as a small town
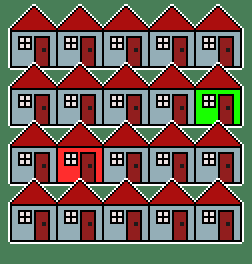
Every row of houses is a table, and multiple rows make the whole town, or in our case our level.
The green house is on the 2nd row on the 5th column.
The red house is on the 3rd row on the 2nd column.
With 2D tables we access the values like this:
tilemap[4][3]
This means: The 3rd value of the 4th table. Or: The 3rd column on the 4th row.
Let's draw our level. Because we have a 2D table, we need to use a for-loop inside a for-loop. This is also called a nested for-loop.
function love.draw()
    --Let's do it without ipairs first.

    --For i=1 till the number of values in tilemap
    for i=1,#tilemap do
        --For j till the number of values in this row
        for j=1,#tilemap[i] do
            --If the value on row i, column j equals 1
            if tilemap[i][j] == 1 then
                --Draw the rectangle.
                --Use i and j to position the rectangle.
                -- j for x, i for y.
                love.graphics.rectangle("line", j * 25, i * 25, 25, 25)
            end
        end
    end
end
So we loop through our rows, and for every row we loop through our columns.
We use j, of our inner for-loop, for our horizontal positioning and i, of our outer for-loop for the y positioning. Remember that these are just variable names and can be named whatever, but using i and j like this is common.
Let's turn the for-loops into an ipairs loop.
function love.draw()
    for i,row in ipairs(tilemap) do
        for j,tile in ipairs(row) do
            if tile == 1 then
                love.graphics.rectangle("line", j * 25, i * 25, 25, 25)
            end
        end
    end
end
We use the variable names row and tile to make it more clear what is going on. We loop through the table tilemap, and each value is a row. We loop through the row and each value is a tile.
We can also use different numbers for our tiles, and use these numbers to give the tiles different colors.
function love.load()
    tilemap = {
        {1, 1, 1, 1, 1, 1, 1, 1, 1, 1},
        {1, 2, 2, 2, 2, 2, 2, 2, 2, 1},
        {1, 2, 3, 4, 5, 5, 4, 3, 2, 1},
        {1, 2, 2, 2, 2, 2, 2, 2, 2, 1},
        {1, 1, 1, 1, 1, 1, 1, 1, 1, 1}
    }
end

function love.draw()
    for i,row in ipairs(tilemap) do
        for j,tile in ipairs(row) do
            --First check if the tile is not zero
            if tile ~= 0 then

                --Set the color based on the tile number
                if tile == 1 then
                    --setColor uses RGB, A is optional
                    --Red, Green, Blue, Alpha
                    love.graphics.setColor(1, 1, 1)
                elseif tile == 2 then
                    love.graphics.setColor(1, 0, 0)
                elseif tile == 3 then
                    love.graphics.setColor(1, 0, 1)
                elseif tile == 4 then
                    love.graphics.setColor(0, 0, 1)
                elseif tile == 5 then
                    love.graphics.setColor(0, 1, 1)
                end

                --Draw the tile
                love.graphics.rectangle("fill", j * 25, i * 25, 25, 25)
            end
        end
    end
end
Or a better way to do this:
function love.load()
    tilemap = {
        {1, 1, 1, 1, 1, 1, 1, 1, 1, 1},
        {1, 2, 2, 2, 2, 2, 2, 2, 2, 1},
        {1, 2, 3, 4, 5, 5, 4, 3, 2, 1},
        {1, 2, 2, 2, 2, 2, 2, 2, 2, 1},
        {1, 1, 1, 1, 1, 1, 1, 1, 1, 1}
    }

    --Create a table named colors
    colors = {
        --Fill it with tables filled with RGB numbers
        {1, 1, 1},
        {1, 0, 0},
        {1, 0, 1},
        {0, 0, 1},
        {0, 1, 1}
    }
end

function love.draw()
    for i,row in ipairs(tilemap) do
        for j,tile in ipairs(row) do
            --First check if the tile is not zero
            if tile ~= 0 then
                --Set the color. .setColor() also accepts a table with 3 numbers.
                --We pass the table with as position the value of tile.
                --So if tile equals 3 then we pass colors[3] which is {1, 0, 1}
                love.graphics.setColor(colors[tile])
                --Draw the tile
                love.graphics.rectangle("fill", j * 25, i * 25, 25, 25)
            end
        end
    end
end
So we can make a colorful level, but now we want to use images. Well that's easy, just add an image, get the width and height, and draw the image instead of a rectangle.
I will use this image:

function love.load()

    --Load the image
    image = love.graphics.newImage("tile.png")

    --Get the width and height
    width = image:getWidth()
    height = image:getHeight()

    tilemap = {
        {1, 1, 1, 1, 1, 1, 1, 1, 1, 1},
        {1, 2, 2, 2, 2, 2, 2, 2, 2, 1},
        {1, 2, 3, 4, 5, 5, 4, 3, 2, 1},
        {1, 2, 2, 2, 2, 2, 2, 2, 2, 1},
        {1, 1, 1, 1, 1, 1, 1, 1, 1, 1}
    }

    colors = {
        --Fill it with tables filled with RGB numbers
        {1, 1, 1},
        {1, 0, 0},
        {1, 0, 1},
        {0, 0, 1},
        {0, 1, 1}
    }
end

function love.draw()
    for i,row in ipairs(tilemap) do
        for j,tile in ipairs(row) do
            if tile ~= 0 then
                love.graphics.setColor(colors[tile])
                --Draw the image
                love.graphics.draw(image, j * width, i * height)
            end
        end
    end
end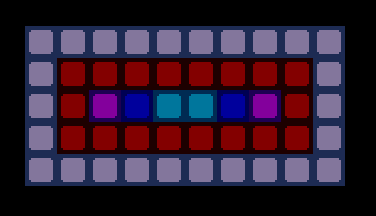
So that's easy. But what if we want to draw different images? Well we could use multiple images, but in the previous chapter we learned how we can draw part of an image with quads. We can use this for tiles as well.
Let's use this tileset:

First we need to create the quads.
function love.load()

    --Load the image
    image = love.graphics.newImage("tileset.png")

    --We need the full image width and height for creating the quads
    local image_width = image:getWidth()
    local image_height = image:getHeight()

    --The width and height of each tile is 32, 32
    --So we could do:
    width = 32
    height = 32
    --But let's say we don't know the width and height of a tile
    --We can also use the number of rows and columns in the tileset
    --Our tileset has 2 rows and 3 columns
    --But we need to subtract 2 to make up for the empty pixels we included to prevent bleeding
    width = (image_width / 3) - 2
    height = (image_height / 2) - 2

    --Create the quads
    quads = {}

    for i=0,1 do
        for j=0,2 do
            --The only reason this code is split up in multiple lines
            --is so that it fits the page
            table.insert(quads,
                love.graphics.newQuad(
                    1 + j * (width + 2),
                    1 + i * (height + 2),
                    width, height,
                    image_width, image_height))
        end
    end

    tilemap = {
        {1, 1, 1, 1, 1, 1, 1, 1, 1, 1},
        {1, 2, 2, 2, 2, 2, 2, 2, 2, 1},
        {1, 2, 3, 4, 5, 5, 4, 3, 2, 1},
        {1, 2, 2, 2, 2, 2, 2, 2, 2, 1},
        {1, 1, 1, 1, 1, 1, 1, 1, 1, 1}
    }

end
Now that we have a table with quads, we put the number in our tilemap based on which quad we want. Based on the order we created our quads, they are on this position in our table:
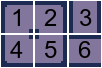
So if we wanted to create this:

We would make our tilemap look like this:
tilemap = {
    {1, 6, 6, 2, 1, 6, 6, 2},
    {3, 0, 0, 4, 5, 0, 0, 3},
    {3, 0, 0, 0, 0, 0, 0, 3},
    {4, 2, 0, 0, 0, 0, 1, 5},
    {1, 5, 0, 0, 0, 0, 4, 2},
    {3, 0, 0, 0, 0, 0, 0, 3},
    {3, 0, 0, 1, 2, 0, 0, 3},
    {4, 6, 6, 5, 4, 6, 6, 5}
}
If you compare the tilemap with the image and the numbers you can see how each tile is used.
Now we need to draw the correct quad.
function love.draw()
    for i,row in ipairs(tilemap) do
        for j,tile in ipairs(row) do
            if tile ~= 0 then
                --Draw the image with the correct quad
                love.graphics.draw(image, quads[tile], j * width, i * height)
            end
        end
    end
end
So on (1,1) we draw the quad on position 1. On (1,2) we draw the quad on position 6, etc.
If you run the game you'll see that our level now looks like the image above.
Now that we have a level, let's create a player that can walk around, but not go through walls.
I will use this image for the player:

function love.load()
    image = love.graphics.newImage("tileset.png")

    local image_width = image:getWidth()
    local image_height = image:getHeight()
    width = (image_width / 3) - 2
    height = (image_height / 2) - 2

    quads = {}

    for i=0,1 do
        for j=0,2 do
            table.insert(quads,
                love.graphics.newQuad(
                    1 + j * (width + 2),
                    1 + i * (height + 2),
                    width, height,
                    image_width, image_height))
        end
    end

    tilemap = {
        {1, 6, 6, 2, 1, 6, 6, 2},
        {3, 0, 0, 4, 5, 0, 0, 3},
        {3, 0, 0, 0, 0, 0, 0, 3},
        {4, 2, 0, 0, 0, 0, 1, 5},
        {1, 5, 0, 0, 0, 0, 4, 2},
        {3, 0, 0, 0, 0, 0, 0, 3},
        {3, 0, 0, 1, 2, 0, 0, 3},
        {4, 6, 6, 5, 4, 6, 6, 5}
    }

    --Create our player
    player = {
        image = love.graphics.newImage("player.png"),
        tile_x = 2,
        tile_y = 2
    }
end
The tile_x and tile_y is the player's position on our tilemap. This number will be multiplied by the tile width and height when drawn. But first let's make it move. Instead of smooth movement we will make it jump to its next position, so we won't be needing dt for the movement. This also means that we don't want to know if the movement keys are down, but if they are pressed. For this we use the love.keypressed event.
First we create local x and y variable. Next we add or subtract 1 to this variable based on the key that was pressed, and finally we assign this value to the player's position.
function love.keypressed(key)
    local x = player.tile_x
    local y = player.tile_y

    if key == "left" then
        x = x - 1
    elseif key == "right" then
        x = x + 1
    elseif key == "up" then
        y = y - 1
    elseif key == "down" then
        y = y + 1
    end

    player.tile_x = x
    player.tile_y = y
end
Now that it can move, let's draw it.
function love.draw()
    for i,row in ipairs(tilemap) do
        for j,tile in ipairs(row) do
            if tile ~= 0 then
                --Draw the image with the correct quad
                love.graphics.draw(image, quads[tile], j * width, i * height)
            end
        end
    end

    --Draw the player and multiple its tile position with the tile width and height
    love.graphics.draw(player.image, player.tile_x * width, player.tile_y * height)
end
When you run the game you should be able to walk around with your player. But the problem is that he can walk through walls. Let's fix this by checking if the position he wants to go to is a wall.
First make a function called isEmpty. Inside we return whether the value on the coordinates equals 0.
function isEmpty(x, y)
    return tilemap[y][x] == 0
end
It might look weird that x and y are turned around, but this is correct. Because the y position is the row and the x position is the column.
Now that we have our function we can check if where we want to go is an empty spot, and if so it means we can walk.
function love.keypressed(key)
    local x = player.tile_x
    local y = player.tile_y

    if key == "left" then
        x = x - 1
    elseif key == "right" then
        x = x + 1
    elseif key == "up" then
        y = y - 1
    elseif key == "down" then
        y = y + 1
    end

    if isEmpty(x, y) then
        player.tile_x = x
        player.tile_y = y
    end
end
Yay, now our player is trapped inside our walls. Try to see if you can make it pick things up, or have it open a door when you touch a key. Play around with this because that is how you learn.
We can use tiles to make levels. A tilemap is made out of rows and columns. Each row contains a number of columns. Rows are lined up vertically and columns horizontally. We can use a tileset and quads to draw our level.
Do you need help or do you see a mistake?
Leave a comment or edit this chapter.
❗ Wishlist my upcoming game To Bring Her Back on Steam! 😊


© 2021 Sheepolution